Integrity devotional released!
Buy Now

Home With Carolyn

Lego Organization


Help! There are Legos everywhere?!

Well, first of all, that is a good thing that there are Legos everywhere! That’s great that your child enjoys using their imagination and building. I do agree with many people that Legos are pretty awesome. We are avid fans of Legos and have enjoyed buying and building many sets during the long winter months. We have also enjoyed visiting Legoland! More on that in another article!

For now, let’s talk about how in the world we can help our children with their Lego organization.

Try these tips and let me know what works for your family!

Tips

1. Take the Legos your child is done building and ask them which ones they want to display in their room! Make two piles. One pile for legos to display and one pile for legos to not display. If you are sentimental like me, take photos of each one that won’t be displayed and make it into a Shutterfly photo book! That way, even when they aren’t on display anymore you can look back at the Shutterfly photo book of Lego pics. I do this from time to time with this photo book.

2. Put the Legos your child decided to display on floating shelves going across the room and the open bookshelves going across the room. I got mine from Target. I actually used them inside my classroom for bins before this purpose, but I’m happy they are being used for legos now. Having legos on both floating shelves and open bookshelf units will give various display points. I also taped led remote lights along the corners and length of the bookshelves so they can be lit up for display. I recommend taping and not sticking since I learned it really won’t come off after putting it on.

3. Take all the pieces that are left over and not being displayed and put them into bins by color. We did this when my son was under the age of 7. It worked well! However, after visiting Legoland and my son exploring Legos more on his own, he wanted them mixed up! We did three colors in each bin now. We do have a separate bin organizer for wheels though and then a separate bin organizer for people and special items. He enjoys diving into a bin now with mixed colors! Do what works for your child at the stage they are in.

We really like our new Lego organizers that stack on top of each other.  I got them in grey and blue.

Note: The picture above is no longer how our playroom looks.  You can read the Light It Up Playroom post on how we changed this room to more closed cabinets.

4. Make sure your child cleans up their Legos when they are done playing! Keep it in one place-their playroom or bedroom. That way, you are not stepping on Lego pieces and getting hurt in your living room. We keep Legos to only these two places. It keeps it all contained which keeps our home cleaner! I do from time to time let my son build in front of the fireplace in the living room, but he has to bring it back to his bedroom or playroom when he is done. It’s okay to tell your kids that your living room is your space.

5. Organize all of those Lego books into binders.  Believe me, you will have a lot as the years go on.

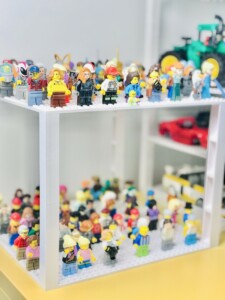
6. Find those Lego people which have been sitting in boxes and display them in a baseplate so your child can see them and use them more often. I wish I did this earlier.

I hope that some of these tips help! Check out my Legoland article if you want to find out more about a trip there!

Shop the Post
Room Copenhagen, Lego Storage Brick Box – Stackable Storage Solution – Stone Grey
Strictly Briks Classic Baseplates
Novogratz Cache 2 Door Metal Locker Storage, Mint Cabinet
Novogratz Cache 2 Door Metal Locker Storage, Yellow Cabinet
Room Copenhagen, LEGO Brick Box Stackable Storage Containers
Event Planning

Planning a Block Party

The Importance of Community

After the pandemic, many people were more than ready to get together! They were tired of being isolated and craved community. Because our neighborhood was growing so quickly, it was definitely time to bring everyone together!

Bringing together your neighbors? Here is an idea. Have a luau! We were asked to host and plan the neighborhood block party for over 70 people, so let me give you some tips that helped it go smoothly!

People will come together to help!

I found that there were around 20 people who were truly dedicated to putting in some hard work helping. I had neighbors helping with the pineapple flower centerpieces, neighbors putting up canopy tents for shades, neighbors going out to buy another canopy tent, neighbors who set up a volleyball net, and neighbors helping set up the food buffet. I had neighbors who helped blow up the balloon garland, and neighbors who helped tie down the photo backdrop. It was hot though! It’s challenging getting set up when you are dripping with sweat! I recommend not doing a summer block party since the heat can be unbearable. It was nice to have the help and kindness of neighbors in planning the event though despite the heat.

Tips

1. Don’t use your own money to pay for the block party.  Be sure the community has voted and agreed on what funds can be used for the block party in advance before planning a block party. Your budget will decide what you can do.

2. Skip the food trucks since they are so expensive unless your HOA and the community vote on this idea way in advance.

3. Have a Google sign up sheet for items, not just food. Especially if you are planning on a summer party in the heat- see if people can bring chairs and tents for rest and shade. We were able to have everyone come together and sign up for food, chairs, tents, lawn games, trash bags, trash cans, coolers, ice, drinks, and such. Neighbors coming together to create the event builds more community. Enjoy the time planning with neighbors!

4. Have multiple zones. I use the word zone as in areas/stations for certain activities and age groups.

—We had one home area out front that was the zone area for the food buffet and eating with canopies put together under the shade. We wanted extra shade for this area. The drinks and coolers were placed out in front of some lawn games as well and additional seating areas. The photo backdrop was also placed in this zone.

—We had our home area out front that the was the zone area for kids with the inflatable waterslide, kiddie pool, water balloons, bubbles, basketball, playset, and sidewalk chalk. We also had the icecream truck set up in front of the kid zone.

—We had the next house area out front that was the zone area for the volleyball game and pickle ball. This attracted more teenagers.

5. Advertise the event with a Canvas Save the Date via email, but also take the time to print it out and hang it on the doors since not everyone checks or uses email, and you don’t want to miss anyone.

6. Clean up can be rough unless you have wagons and help! We used wagons to load everything back up and bring it to our driveway. Neighbors knew to pick up their chairs or canopies or whatnot in our driveway or the neighbor’s driveway. We were very tired and sweaty by the end of the day so wearing a straw beach hat was helpful! It was also thoughtful that a few neighbors were willing to help clean up and haul items back to their home or another neighbor’s home.

Again, even though a block party can be a lot of work, I do think it is worth it to bring your neighbors together and meet new people! The planning process brought people together and overall helped to bring neighbors together.

Home With Carolyn

Organizing Your Refrigerator

Smelly Food, Leftovers, and What is That?

If you find yourself thinking this when you open your refrigerator, then it is time to figure out a new solution to how you are organizing your food.

With all good intentions, you are planning meals and getting healthy produce! However, it may be getting lost behind other items, and then you eventually find it at the back of the refrigerator all moldy and smelly. I was definitely guilty of food waste before I figured out this organization method that works better for my family.

Yeah, I’ve been there, so don’t feel bad about it.  It’s so easy for food items to get lost in the refrigerator when everyone is going in and out of it all of the time. It can be overwhelming trying to keep everything where you can see it especially for deep refrigerators where food can be easily hidden.

Let me tell you how I changed my refrigerator so this never happens again.


1. I measured the inside of my refrigerator and wrote down the dimensions.

2. I looked on Amazon for organizers that would fit these dimensions paying careful attention to the width and depth of each organizer. I penciled it out on paper. I double checked with my husband since he is better at measuring. I double checked with the how it would be set up in my refrigerator.

3. I wanted organizers for putting my greens into so I got the veggie organizers below. I liked how they are stackable and keep my vegetables fresh. I also ordered the other refrigerator organizers below. Remember, they fit my dimensions of my refrigerator, so double check your dimensions before ordering your organizers. I bought 2 egg organizers as well which save me more space. I also ordered refrigerator labels from Amazon ahead of time. (scroll to bottom to check them all out!)

4. The day the organizers arrived, I emptied it all out excitedly. Yes, I know. I emptied the entire refrigerator out!! I wiped it all down as if we were moving out. I threw out bottles that were expired and food that had gone bad. I kept everything else and set it up on my kitchen island.

5. I started at it with labeling each organizer and putting food into it. Take your time with this and find a system that works the best for your family.

7 months has passed now. So is it working?

It definitely helps!

I am not going back to the way it used to be.  I am committed to keeping it this way so I don’t get into the same situation I was before. This is working as long as everyone in the family follows the system, and I do weekly clean outs if needed. I have had to teach my family (and yes my husband) to put the fruit in the fruit bins and the leftovers in the leftover bin. When things don’t fit, we put them in the “this or that” bin.  When we host, it can get crowded again with all of the food hosting items.  What I do in this situation is to temporarily put the fruit bins in my pantry during that time period, so I have more space.  I will also take the drink organizers out and allow my family to use them from my kitchen counter.  Definitely teach your children to pour their drinks from the drink dispenser (even in the refrigerator) since it saves you space and time.  We use a paper towel over where it may drip, and this has helped with any sticky messes inside of the refrigerator.  Lastly, remind your kids where their healthy snacks are labeled at the bottom of your refrigerator (within easy reach). I like to store cheese sticks, yogurts, and bagged veggies in that area.

Over time, I have discovered that the “leftover” labeled organizer and “this or that” labeled organizer have proved to be helpful  for items that didn’t fit into my other labels. The 2 labeled “drinks” containers really have been nice to pour my drinks into such as lemonade or tea since it takes less space in the refrigerator. My son enjoys using the refrigerator more and knows exactly where his healthy snacks are organized. There is less food waste as well!

This didn’t take too long. Anyone can do it! If it promotes more healthy eating in your house, then I think it was worth it!

Check out my shop below if you want to try any of these organizers out today. It took me less than an hour to do this, and it really helps to make life so much easier.

Shop the Post
MineSign 6Pack Plastic Stackable Food Containers With Vented Lids And Removable Drain Tray Refrigerator Produce Saver
HOOJO Refrigerator Organizer Bins – 4pcs Clear Plastic Bins For Fridge
mDesign Plastic Kitchen Organizer
mDesign Stackable Plastic Covered Egg Tray Holder
mDesign Home Organization Labels – Preprinted Label Stickers for Kitchen Pantry
Decorating

A Coastal Styled Christmas

“All is calm. All is bright.”

This year, I put the word “calm” under my Christmas tree. I am relearning what the word “calm” means and looks like in such a rushed and frenzied world that so often seeps into my home. I am slowing down, taking a pause from my career, and realizing how busy I have been over the past 18 years between work, family, and trying to make the holidays special.

One of these years, I would love to design my own coastal Christmas decor because it is very challenging to find!

I think we all need to get back to the “calm” that the waves from the coast bring.  This does not have to visiting the beach during Christmas time.  We can bring that calm into our homes this Christmas through our faith and a coastal Christmas style. I enjoy the Christmas events and festivities just like so many of you and finding special gifts for family and loved ones; however, I am pausing this holiday to reflect on what “calm” means and looks like.

How can we create that “calm and bright” environment in our homes? I’ll write more on that in my faith section of this blog.

A Coastal Inspired Christmas

I have actually never spent a Christmas at the coast, but one of these holiday seasons I would love to! In my mind, I try to imagine a coastal-inspired Christmas and what that looks like. Bring that calm into your home with starfish, seashells, and warm lighting.

I have been able to find coastal-inspired Christmas decor over the years from Christmas Tree Hill or Home Goods. Slowly, I have collected starfish that I place into the emptier parts of my Christmas tree, seashell ornaments, beachy snowmen, coral ornaments, fish and jellyfish ornaments, whales, and anchors. I was even able to find these adorable seashell lights at Christmas Tree Hill that I wrap around my coffee tables. I aim to complement the waterscape paint color by Sherwin Williams and the gold hardware in my kitchen so I’ll often use the sea green, gold, and white color scheme for Christmas. Other shades of green also complement it for Christmas if you want to try that out as well. I also put seashells under my tree in a basket with other larger seashells my grandma received from the South Pacific. My larger snowman has starfish instead of buttons and a beach straw hat instead of a black hat. It’s fun to see this theme unfold. My stockings have shades of teal and waterscape in them with trees layered with gold beading. My son’s stocking is a white polar bear that is soft and cuddly.

Whether or not you bring this coastal styled Christmas into your home or not, I wish you a peaceful and restful holiday season with your loved ones.

What are you planning on doing for your coastal Christmas decor this year?

Parenting

The Beauty of Curiosity

I don’t know about you, but I aim to live my life in a simpler time.  A time where we play outside, run down the sidewalk, and hang out with neighbors at the spur of a moment.  A time with unplanned activities where we play in our yard for hours until it gets dark outside.  This is the time I remember as a child.  This is the simpler time I aim to provide my son with, and it can be attainable if we just do it.

Lets pause and be amazed at our child’s curiosity and imagination instead of getting frustrated by the clutter of toys in our home because someday they will be gone at college, and we will be sitting at home at an empty and very quiet house.

Hard at Work Playing

Kids are hard at work playing, and it is through their play that they grow and learn. Each toy you have on your floor should bring learning to your child in one way or another. If it doesn’t then it is not working for their development. Yes, they are responsible for cleaning up their toys, but don’t get rid of toys that are fostering your child’s imagination and creativity. Encouraging our children and teenagers to invent, design, and create is one of our most important roles.

Nurturing Creativity

I won’t ever forget when my son declared with excitement that he wanted to be an inventor at the early age of 4, and now 4 years later he has gadgets and notebooks filled with his inventing ideas. You will find him regularly carrying around his tiny gadgets in a suitcase or a box. I’ve tried to foster his curiosity and imaginative thinking over the years. I want to continue to nurture his creativity as the years go on.  How can we do this in a practical way at home?

Try Out STEM Activities

I’ve researched ideas for STEM activities and included those in his toys and play activities.  In my opinion, STEM toys and activities are one important thing that you can implement with your child that will help your child to continue to stay curious and grow in their problem solving skills. We did the Amazon STEM club with monthly STEM activities. We also did the monthly Tinker Crate Kits and now we are on to the Eureka Crate Kits for engineering.  Legos has also become our favorite toy. I created a Shutterfly book of all my son’s Legos from his early years of building, and I hope to make a second Shutterfly book of his new Legos he has built. Try these activities out and let me know how it goes. I posted a STEM gift guide article that you can check out here on my blog and find toys to choose from for this.

Reclaiming Curiosity

Let’s work harder at the work of curiosity asking questions, figuring things out, enjoying play, and finding delight in the simplest parts of life. I think somewhere between our adolescence and adulthood that some of us lose our curiosity and fascination with life. We lose our sense of wonder. I hope you can reclaim your wonder and the wonder of your children this season of your life while it is at its peak.

Decorating

Coastal Retreat Gallery Wall

You don’t need to spend much money to do a gallery  wall. One day when I was at Home Goods, I saw these pictures that all tied together. I didn’t measure or mark the wall. I just eyed it one by one. If you don’t feel comfortable eyeing it then use painting tape on the wall beforehand with where you want each one to go. It doesn’t need to be complicated to make a gallery wall. Find pictures that speak to you and bring you a sense of peace and delight. I’d love to see what you find!